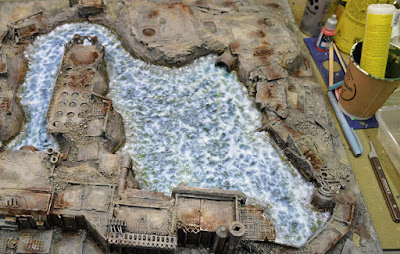
What is this tomfoolery about again? This.
Painting the toxic water refinery modular board, and a few notes about it.
Should have made a decent (flat & solid) surface for the green sludge areas. I only partly covered the wood chip texture with filler. Started by basecoating it with very thick layer of PVA glue and green paint (as seen on the first pics), and thought it would be enough to hide the texture beneath. Was wrong, and had to do a few more layers of thick paints, mediums and glues later. That slowed down the painting (and drying!) process a LOT. Next time I'm wiser!
That dark green spray paint was crap as a basecoat. Other paints didn't like to stick on top of that. Luckily the piece was mostly covered with the dark granite effect & grey basecoats. But now many of the deepest nooks and crannies are coloured dark green a.k.a. bright medium pine green. But it's okay since this is a toxic water refinery. Wiser next time. Oh, the basecoats we're sprayed on when it was SUPER windy, raining and close to zero degrees outside. Worked just fine.
Again gallons of dirty waters were applied. Sometimes tinted with different paints. I feel this has to done many many times and in different phases of the painting to get nice and decent level of grime and dirt going on. No cheating here. Gotta be old, thick, murky and smelly waters. Gotta get disgusted when applying such horrors.
The grey areas were matt varnished at some point. Don't want any chips of paint fall off later when anxious gaming sessions are on. So gotta put that varnish on BEFORE the final stages of painting, because I want to get different levels of glossiness in the end. Mostly just dull greys, drybrushed sharp edge details (for example very matt Underhive Ash Dry paint on some areas), bright metals on others, moist & damp leakages and rust elsewhere (Agrax Eartshade Gloss among others). I also like to keep the overall effect quite monotone, to not distract and prevent seeing the miniatures when gaming.
The green sludge areas also got countless amounts of different paints, mediums and dirty waters on them. Dripping, pooling, wet blending... Really tried to get some deep 3d feel in there. The final layer of water effects (Noch) sealed the deal. Was the first time I tried it, and it was very likeable stuff. I stippled on a thick layer of that with a brush to get the wavy texture and some tiny bubbles going on. Still not cured thoroughly in these pictures. And the wavy surface doesn't look that nice on the pictures because of all the light reflections on it, so the huge amounts of different shades and textures underneath the glistening surface don't really show through. Wiser next time.
My favourite way for painting RUST is:
1) Basics acrylic Burnt Umber, varying between very thick and thin, slightly watered down in places.
2) Maybe highlight/drybrush edges with some gun metal or silver at this point?
3) Washes and glazes here and there (not everywhere), Agrax Earthsade, Seraphim Sepia, Game Color Flesh Wash, dirty waters and such.
4) My very OWN mix labeled "OKHRA INK" on the recess. Two years old. Gets better (and smellier) when aging. I have NO idea what went into this, pretty sure some Kiilto universal cleaning liquid, dirty water and a few drops of most of the yellow, orange, brown, grey and off white paints and washes I've got. It propably also had some of the original ginger shot drink left in the bottle as well. Yugh. Very thin consistency, perfect ochre colour. The multitudes of different pigments it has seem to seperate a bit when drying, so it produces very cool gradients of colour.


No comments:
Post a Comment