Tried some object source lighting for the first time, on the Shokkjump Dragstas speshul shokk gubbinz. Came out very nice! Kabalite Green wet blended to Verdigris Glaze, with thinned Ork Flesh contrast paint and Hexwraith Flame used as glazes, so that the colour would be more green, and different enough from the huge amounts of verdigris (Kabalite Green & Nihilakh Oxide) elsewhere on the model(s).
Also the amount & size of checker
patterns is something I've never done before. Utilised a pen in hope
for faster results. Then the acrylic gloss varnish partially dissolved
the "water proof permanent" patterns I had drawn... Darn! So had to
re-paint all the white little boxes. Again, lots of dirty paint water
bottom sludges for weathering.
A hobby blog about collecting, converting & colouring miniatures. DIY tabletop terrain making & wargaming, mostly Warhammer Age of Sigmar, 40k and Necromunda. Dirty waters & thick paints.
Thursday, 31 October 2019
Monday, 28 October 2019
Painting the Buggies & Gorkanaut WIP
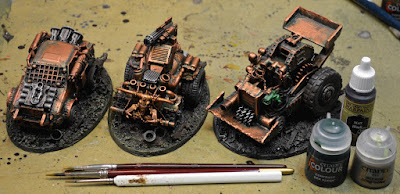
A few hours of splashing paints on da Buggies & Gorkanaut this morning. Pretty much the same methods as in the Killa Kans & Gretchin before. The bases are so big I didn't want to use all the Dark Tone I had left, so mixed up something a bit similiar from 10 different paints, washes and mediums.
Tried to use subtle highlights/drybrushes of Khaki & Bone White UNDER the layer of Blood for the Blood God, to see if that would create decent highlights for the red/bloody areas. Came out crap. Need to do something for those reds again... The Shokkjump Dragsta's Ork "driver" was basecoated with Pale Grey Blue and then coated with Ork Flesh contrast paint, which came out quite nice. Might try Khaki instead as the base coat next time, and highlights of Snake Scales & Poisonous Cloud.
Tried to use subtle highlights/drybrushes of Khaki & Bone White UNDER the layer of Blood for the Blood God, to see if that would create decent highlights for the red/bloody areas. Came out crap. Need to do something for those reds again... The Shokkjump Dragsta's Ork "driver" was basecoated with Pale Grey Blue and then coated with Ork Flesh contrast paint, which came out quite nice. Might try Khaki instead as the base coat next time, and highlights of Snake Scales & Poisonous Cloud.
Saturday, 26 October 2019
Big Mek & Weirdboy
Oh, I ferget to include these two characters in the recent posts. Built & based them a week ago, even though the old nice Weirdboy model went on without any conversions (discounting the skull added to the staff in the early 2000's). Big Mek on the other hand is a full blown kitbash scratch built conversion.
Putting some paint on the Boyz, Buggies & Gorkanaut
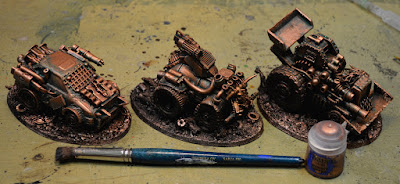
Army Painters Matt Black as a primer. The vehicles were basecoated with Prof Copper & Hardcore Gold, and Boyz with medium matt grey (forgot the brand, whatever should work). Then washes, texture & contrast paints and drybrushes as seen on the pics.
Ork Boyz & Buggies
Recently I've mostly been converting Ork Boyz. Searched through bits boxes and sorted out the orky materials. Got some of my old plastic 90's Orks from Space Crusade and WH40k 2nd edition in there. Also, my dear friend found a random collection of Ork & Necron models (around twenty troopers and some vehicle bits) from flea market last winter, and brought that lot for me. So sweet & lovely!!! A few modern Mek / Nob bits found their way in as well, as I got their sprue leftovers on top of other purchases earlier this year. Shoulder pads made from cut up felt pen.
The Boyz were quickly bashed together with a method I've been earlier using with Chaos Cultists, Pox Walkers and such. First sort out roughly the required number of body parts and weapons in one container. It's propably best, if the numbers don't exactly add up. If there's a hand or two missing, who cares. Just glue the gun straigth to the shoulder. Bored of the 4 identical looking bodies? Cool, just cut them all in half (horizontal or vertical, doesn't matter) with pliers, mix up, and glue back without fitting/measuring. Missing a pair of legs? No problem, 2-3 screws should do the trick.
I've noticed this approach gives very nice and often unpredictable poses, which can be even further exaggerated (or balanced down a bit if needed) with basing the models on uneven surfaces. A good example of this is the Nob with rokkit launcha & screw as arms, who's in kind of a climbing position. Would have been very different story, if that model had been put in to a plain and flat base. I tend to make a whole bunch of bases at a time, and then quickly try and find out the suitable miniature + base combos.
Tried to do oval bases from foam board. That worked out very nice. Just drew the outlines on the board and cut them out with utility knife.
First I cut very carefully along the drawn line so that the blade
didn't go through the board, but just the surface layer. Then I
pressed the blade through the whole board in a slight angle (to imitate
the GW bases), touching the tables surface. Then I made the
actual cut through the foam board by sliding the board along the tabletop,
keeping the knife firmly in place. Very clean cut, and the angle on the
bases edge remains constant. The edges were then painted twice with a mix of PVA and black paint for some structural integrity. Wohoo! Cheap! Easy! Good!
Hot glued cool bits & garbage on the bases. Then PVA glue and sand or "mixed basing mess" (which is all the cutoffs, mould line scrap and other junk from the tabletop that should go straight to the bin. Or actually it shouldn't).
The Boyz were quickly bashed together with a method I've been earlier using with Chaos Cultists, Pox Walkers and such. First sort out roughly the required number of body parts and weapons in one container. It's propably best, if the numbers don't exactly add up. If there's a hand or two missing, who cares. Just glue the gun straigth to the shoulder. Bored of the 4 identical looking bodies? Cool, just cut them all in half (horizontal or vertical, doesn't matter) with pliers, mix up, and glue back without fitting/measuring. Missing a pair of legs? No problem, 2-3 screws should do the trick.
I've noticed this approach gives very nice and often unpredictable poses, which can be even further exaggerated (or balanced down a bit if needed) with basing the models on uneven surfaces. A good example of this is the Nob with rokkit launcha & screw as arms, who's in kind of a climbing position. Would have been very different story, if that model had been put in to a plain and flat base. I tend to make a whole bunch of bases at a time, and then quickly try and find out the suitable miniature + base combos.
The first mob of 10 Boyz with shootas.
The second mob of 10 Boyz with choppas and sluggas.
Hot glued cool bits & garbage on the bases. Then PVA glue and sand or "mixed basing mess" (which is all the cutoffs, mould line scrap and other junk from the tabletop that should go straight to the bin. Or actually it shouldn't).
Subscribe to:
Comments (Atom)


